First of all, you need to check your Alcidae Grager 2’s compatibility with the brand and model of your engine. We give you the brands that Garager is compatible with, PowerDrive, Accessmaster, Chamberlain, Liftmaster, WhisperDrive, Craftsman, Genie..
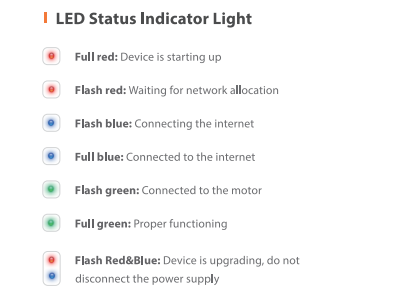
In order to install the application correctly, you must first know the meanings of the indicators. You should fully insert the cables and you should see the green light on the indicator. If the cable connection is correct and the green light is not illuminated, there may be a hardware failure.
If the green light is on, what you need to check now is the wall switch. If the door opens when you turn on the wall switch, everything is fine. Here you may need to check the compatibility of the appliance and the garage door. You can test this compatibility by toggling the engine switch on and off and remaps. In case of possible problems, do not reset the device and do not turn off the power, just do the pairings again and again.

Setting Up wifi conecction and Alcidae app
First of all, set your wifi network to 2.4 Ghz and connect to this wifi network from your mobile phone. For this, log in to the wifi network with the username and login you have set on your mobile phone. For Garage, your router’s wifi area may be insufficient, you can use a mesh router or wifi range extender device for this.
Then download the Alcidae app from the app store and press the “add camera” button on the main menu. Of course, before you get to this stage, you will need to create an account when opening the app. Register with some information such as e-mail phone and location and give the necessary permissions to use the application.
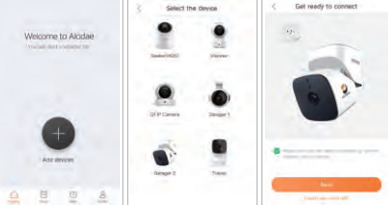
There is one thing you need to do after adding the camera. It usually starts working directly in installations, but for Alciade Gareger 2, first press your reset button for 10 seconds. The LED will turn red and ready for connection. Then follow the NEXT buttons. When the LED lights flash blue and then full blue, your connection is complete. If you have a connection problem, the general problem encountered here is that if you have not given location permission to the application, problem occurs in the connection. Give full permissions.
How to position Alcidae Garager 2
1) How do you choose the most suitable location for your Alcidae Garager 2 device? For this, you need to fix the wifi area problem first. You can fix this problem by using wifi extender for this. Otherwise, you should put the camera close to your router, which will give you fewer options to put the device.
2) It will be healthier if the wall is dry or you mount the camera on a wooden floor.
3) It is recommended to put the Garage 2 upside down or alternative surfaces from under your garage door opener. The camera must be mounted vertically in order to get an ideal view.

Synchronization of the Garager 2 with the Door Opening motor
Relevant cables must be connected to the connectors on the camera. The garage door opener is usually placed on the side wall. When the connections are fully made, the LED indicator turns green.
- Plug in the garage door opener cable
- First, match the garage door with the Alcidae application.
- You can make all the necessary controls through the application.
- You can share your data with someone else through the application. Or you can add other users to manage Alcidae Garager 2.
Note: You can perform the features and adjustments of your camera through the application. Subjects such as motion detection sensitivity, night vision, notification sending and alarm settings are done manually in the settings section of your application.